angle-graphic

CxAlloy Acquires OTTO

OTTO acquisition strengthens CxAlloy’s commitment to innovation

Atlanta (July 23, 2024) – CxAlloy, the market leader in commissioning (Cx) management software today announced the acquisition of OTTO, a pioneering service and technology platform specializing in new construction building analytics and automated functional testing. This product will offer clients a comprehensive and connected commissioning platform when combined with the capabilities of CxAlloy.

OTTO’s innovative platform and services allow commissioning providers to integrate building analytics data during new construction, enhancing their commissioning services with automated functional testing, trend data analysis, and continuous fault detection.

“When I first discovered OTTO’s groundbreaking work several years ago, I admired the technology and envisioned a future collaboration,” said Jacob Terry, CxAlloy’s director of product development. “I’m incredibly excited about what we can accomplish together as a united team. Combining OTTO’s unique automated testing technology with CxAlloy’s unmatched ease-of-use and best-in-class reporting will enable us to raise the bar for commissioning software.”

CxAlloy will support and promote OTTO’s existing offerings while developing the next-generation version of OTTO as an integrated component of CxAlloy. This future version will align with CxAlloy’s dedication to being an open and interoperable commissioning solution, continuously enhancing and expanding its capabilities to integrate with third-party software, including other building analytics products, through its API.

OTTO’s leadership team, including Director and Founder, Derek McGarry, will continue to lead OTTO within CxAlloy, collaborating closely with Terry and the entire CxAlloy team.

“At OTTO, we believe connected commissioning is the future,” said McGarry. “We have long respected CxAlloy and cannot imagine a better partner to grow and enhance OTTO’s capabilities. Together, OTTO and CxAlloy will expand its offerings into a first-of-its-kind platform to bring this new future of connected commissioning to life.”

About CxAlloy

CxAlloy is the market leader in commissioning (Cx) management software. CxAlloy is the #1 cloud-based commissioning management platform for all your commissioning projects including commercial buildings, mission critical facilities, hospitals, educational campuses, laboratories, and more. CxAlloy empowers Cx professionals to accelerate project completion while alleviating waste and rework by providing real-time transparency and automated reporting to the entire project team through instant web access and field-optimized offline apps. Commissioning engineers work smarter and faster with CxAlloy allowing them to get in, get done, and get home. CxAlloy is wholly owned by Trinity Consultants, Inc. 

About OTTO

OTTO provides a technology platform and service solution targeted at commissioning, energy management, and controls professionals to remotely access building analytics for both new construction and existing building projects. Services include remote connectivity solutions, trend data collection and visualization, automated functional performance testing, automated fault detection and key performance metric tracking.

Office Hours

Office Hours

Tuesday, May 7 • 1PM ET / 10AM PT / 5PM GMT

OFFICE HOURS TOPIC

Milestones Preview

This month we’ll be previewing the long awaited Milestones feature! The CxAlloy development team has been hard at work on this innovative capability to track and report on commissioning progress. During our Office Hours presentation, we’ll demonstrate how milestones are created through smart groupings and filters. You’ll then see how those milestones are tracked and reported throughout the project lifecycle to give invaluable insights for commissioning project management. Join us for what is sure to be an exciting feature preview!

Whether you’re just getting started with CxAlloy or you’re an experienced user looking to improve your skills, Office Hours has something for you. Join our live webinar to follow along with CxAlloy experts as they walk through our featured topic – and don’t forget to bring your questions! We’ll open up the floor to questions at the end of our session.

Sign Up Now to Save Your Seat

Optimizing Success: Best Practices in Commissioning Project Management

Commissioning is a critical aspect of construction projects, ensuring that systems and components are designed, installed, and tested to meet the Owner’s Project Requirements (OPR). Effective project management during commissioning is essential for achieving optimal performance and meeting sustainability goals. As a commissioning provider, it is imperative to have a clear understanding of the OPR in the pre-design phase so that the major milestones of commissioning project management can be executed effectively. In this blog post, we’ll explore best practices in commissioning project management, with a focus on tracking milestones, monitoring the commissioning process, and leveraging dashboards for efficient management.

Tracking Commissioning Milestones
Tracking commissioning milestones is crucial for keeping the project on schedule and ensuring that all systems are commissioned in a timely manner. Complexities such as LEED certifications, multi-facility projects, and supply chain lead time impact milestones so it is recommended to stay flexible while maintaining structure. As a commissioning provider, consider implementing the following best practices:

a. Define Clear Milestones: Core commissioning milestones should be defined early. For example, design review, installation verification, functional testing, and performance verification. This provides a roadmap for the entire commissioning process.

Building Commissioning Process

b. Utilize Project Management Software: Adopt project management software to create and monitor a detailed timeline of commissioning milestones. This enables real-time tracking, identifies potential delays, and allows for quick adjustments.

c. Regular Progress Meetings: Conduct regular progress meetings with the major stakeholders of the project team to review, update, and potentially modify the timeline of commissioning milestones. This fosters collaboration and ensures everyone is aligned with the project’s goals. Ideally these meetings should be planned and documented within the Cx project management software.

Tracking Commissioning Process
Effectively tracking the commissioning process is essential for identifying issues early and ensuring that systems are functioning as intended. Here are some best practices:

a. Documenting Procedures: Develop and document detailed commissioning procedures for each system. This documentation serves as a reference for the commissioning team and provides a basis for troubleshooting. Within CxAlloy, the File Line Type has the ability to include documents in reference to a specific line that is requested. This enhances the utilization and storage of critical reports such as Testing and Balancing, Equipment Start-up, and Megger tests.

b. Real-time Monitoring: Use advanced monitoring systems to track system performance and project status in real-time. This allows for immediate identification of deviations from expected performance and facilitates quick corrective actions. For example, interactive dashboards can incorporate day-over-day progress which allows you to specify by trade. If unexpected delays impact a trade with open issues and address them, the dashboard will then automatically adjust and allow stakeholders to modify any dependencies.

c. Quality Assurance Inspections: Conduct regular quality assurance inspections during the commissioning process to verify that installations meet the specified requirements. This proactive approach helps prevent issues before they escalate. Incorporating checklists and tests is essential for ensuring quality during the building commissioning process. A time-saving approach could involve organizing these checks spatially. For example, implementing location-based tests before final commissioning can streamline the process by minimizing the need for multiple visits to the same location.

Using Dashboards for Commissioning Project Management
Dashboards provide a visual representation of key project metrics, making it easier to track progress and identify trends.

a. Centralized Data: Integrate commissioning data into a centralized dashboard that displays key performance indicators, milestones, and potential issues. This allows for quick decision-making based on real-time information.

b. Customizable Dashboards: Use customizable dashboards that cater to the specific needs of commissioning project management. This ensures that the information presented is relevant and actionable for the project team.

c. Regular Dashboard Reviews: Schedule regular reviews of the dashboard with the project team to discuss progress, identify challenges, and strategize solutions. This collaborative approach promotes transparency and accountability.

Incorporating these best practices into commissioning project management can significantly contribute to the success of construction projects. Whether tracking milestones, monitoring the commissioning process, aiming for LEED certification, or utilizing dashboards, a well-managed commissioning phase ensures that systems operate at peak efficiency, meeting both performance and sustainability goals.

Line Types Feature Updates

If you’ve used our commissioning software for managing checklists and tests, you know how important it is to capture and track various types of data as part of your workflows. From providing instructional text on lines to collecting files, our platform provides many ways to ensure compliance and quality control. Today, we’re excited to announce a new set of line types that make it even easier to customize and enforce your requirements. With the latest software update, you can now use signature, file, multiple value, and text input line types in your checklists and tests. These new line types offer more flexibility, better integration, and greater control over your data collection. Let’s take a closer look at each of them and how they can benefit your workflow.

These updates were recently released to Beta users and will be released widely to all users by mid-May 2023.

Signature

Now, you can require a signature for a line to be passed. Signature lines are a new and better option for requiring signatures as part of your checklist or test. Unlike our previous, separate “Signatures” section, these are handled just like any other line, meaning they can be placed anywhere within the checklist or test. They also work with Push Changes just like any other line, so you can add them to a template after the fact and then push them to your checklists or tests.

File

File Lines require uploading a file for a line to be passed. We frequently see checklists and tests that ask users to upload files, but previously there wasn’t a way to enforce that the user actually provided a file. Now with the file line type you can require a file to be provided for the line to pass.

Multiple Value

This Line Type requires selecting one or more values from a set of custom options. With the multiple value line type, you can ask users to “select all that apply”. Enabling the “None of the above” option allows the line to be answered even when none apply.

Text Input

This update requires the user to input a value. Previously users would have to use a line’s Note field to record any non-attribute values, and there was no way to require the user to input the value. Now with the text input line type you can ensure a value is recorded and leave the Note field for actual notes.

In addition to line type updates, we’ve made several other updates to checklist and test functionality:

Line Filtering

Benefit:

Have you ever had to scroll through a test that’s several hundred lines long to find that one line that wasn’t answered? With our new line filtering feature it’s now a trivial task. Line filtering lets you see just those lines that you’re concerned about. You can filter lines by their status (passed, failed, n/a, and unanswered), their type (standard question, header, etc.), and whether they have issues and/or files.

Line filtering

Because we know headers are such an important piece of context we never hide the headers when filtering lines.

Header Collapsing

Benefit:

Makes navigation through long checklists and tests easier.

Individual header sections can be collapsed and new “Expand” and “Collapse” buttons will collapse or expand all header sections.

Line Batch Editing & Copying

Benefit:

We’re always working towards making administrative tasks easier because the goal is to save you time. Batch editing means you can make mass changes – such as allowing n/a across all lines – at once instead of having to edit each line one… by… one. Similarly, batch copying allows the user to select a set of lines and then insert a duplicate of that set anywhere within the template. Combined with our new selection tools, including our quick select options and using shift-click to select a range of lines, it’s now easier than ever to make large-scale edits to your templates.

Line Types batch editing

Batch editing automatically adjusts to the editing options that are shared across your selected lines. For example, if you select both “Information” and “Standard Question” lines, you’ll be able to batch edit their formatting. But if you select only  “Standard Question” lines, you’ll be able to batch edit all options including custom labels for the Passed, Failed, and N/A statuses.

Do you have questions about Line Types? Check out our last line types blog and support article on other line type enhancements made in late 2022 or reach out to our support team at support@cxalloy.com. We’re here to help.

[es_custom_content id=”1″]

iOS Update: Version 7.1 Out Now

Navigation Menu

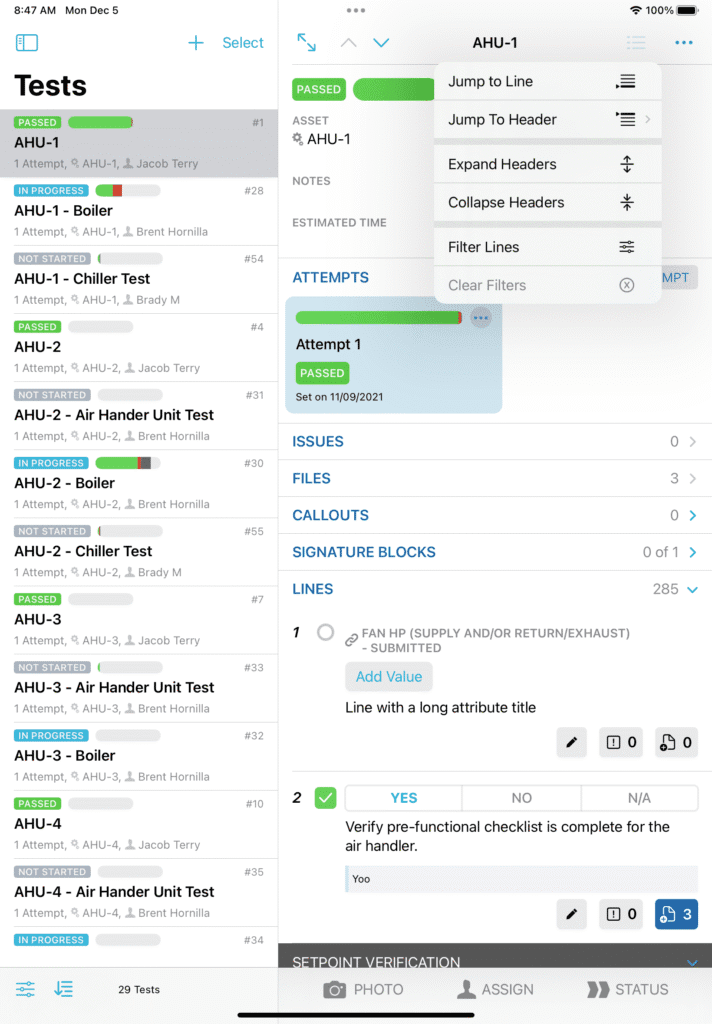
The year might be coming to a close, but we’re still hard at work on CxAlloy TQ updates. We’re excited to fill you in on the new features that were released with our iOS update. Version 7.1 is here – so what does this mean for you? This update includes multiple new navigation functions, like, collapsible headers, filtering updates and more. Below is a full breakdown of each feature: 

Navigation Features

Version 7.1 of the app includes multiple new features in Checklists and Tests that make navigating long forms easier. New features can be found in our new navigation menu when the app is full-screen on an iPad. In situations with less space, such as iPhone, features will be consolidated into the existing action menu.

  • Jump to Header
    If the form is separated with header lines, you can scroll any header quickly by using the Jump to Header action.
  • Jump to Line
    This feature allows you to type in any line number to quickly navigate to that line.
  • Collapsible Headers
    You can now tap on individual headers to collapse the lines under them. Tap again to reveal the lines. You can also select “Collapse All Headers” in the navigation menu to roll up all lines under their respective headers. “Expand All Headers” does the opposite.
  • Filter Lines
    If you want to only see checklist and test lines that have a specific criteria, you now have the ability to filter lines. You can hide lines based on type, status, and whether it has issues or files. There’s also the option to always show headers while filtering lines.

Fast-scroll

To scroll a checklist or test quickly, you can use iOS’ built-in fast scrolling feature. Simply tap and hold on the scrollbar and, after a moment, it’ll get thicker to indicate that you can then drag the scrollbar for a much faster scrolling experience.

Keyboard Shortcuts

For keyboard users, we’ve added keyboard shortcuts for our navigation features. Hold down the command button (⌘) while viewing a checklist or test to see the list of keyboard shortcuts available.

Do you have questions about the 7.1 iOS release? Or, do you have suggestions for new features? You can always reach out via email support@cxalloy.com.

Enhancements to Line Types

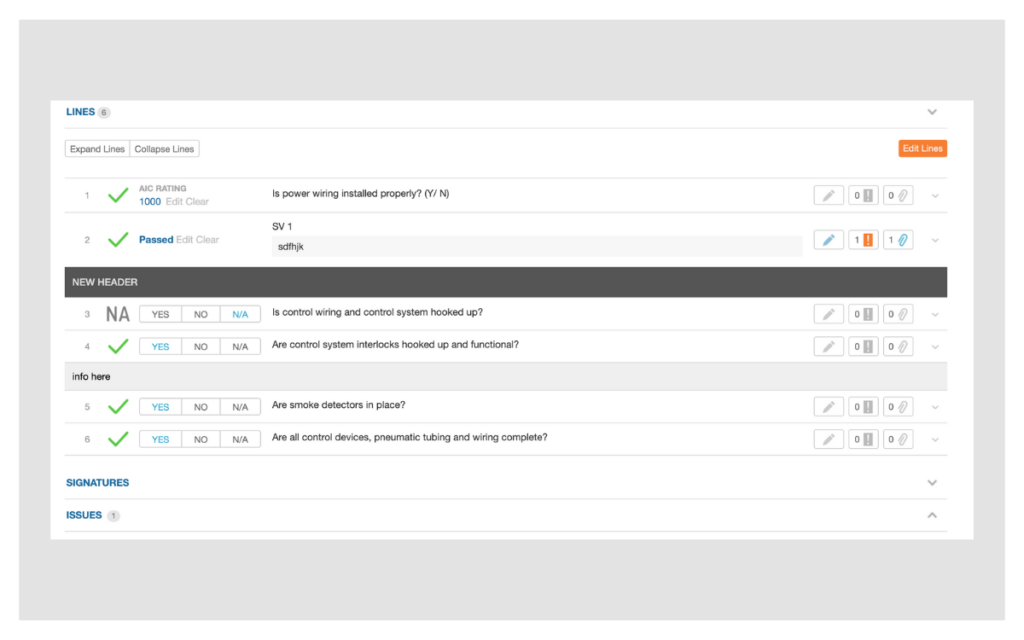
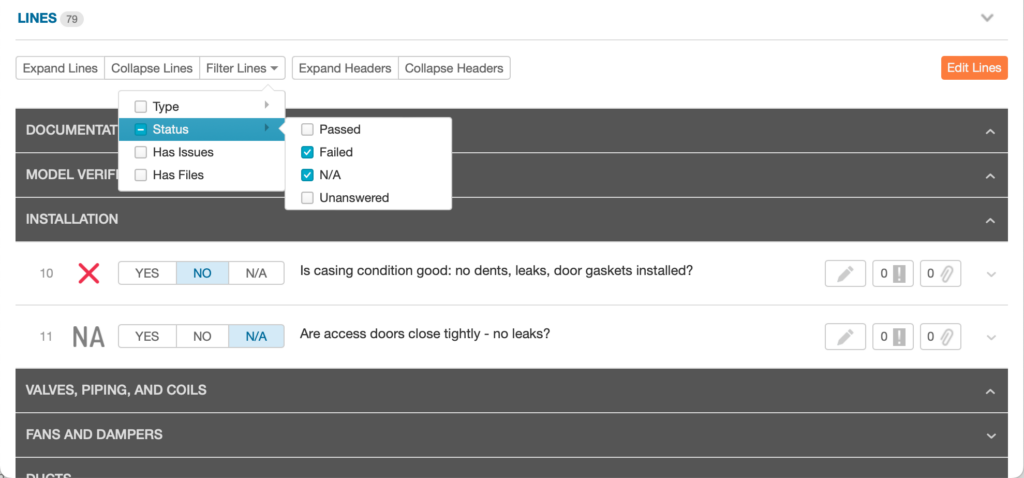
In mid-October 2022, we released significant updates to checklist and test lines, an update we’re calling Line Types. These updates affect how users answer and edit lines and introduce new capabilities. Additional customization of these lines has been an important and exciting feature for us to add because it gives our users more ways to customize the software so it works for their specific needs. We also released a beta version to several accounts that adds two more line type functions: Information and Single Value lines. It also makes available three new line options: Allow N/A, Prompt for Issue, and Custom Labels. The beta version is now available to a significant number of accounts and we thought a quick overview would be helpful. Let’s dive in!

Additional Line Types

Let’s start by explaining the two additional line types now available: Information and Single Value.

> Information Line Type
The Information line type is for showing instructional text. Information lines – just like Header lines – are not numbered and can’t be answered. Here is an example of an Information line below a Header line:

> Single Value Line Type
The Single Value line type requires the user to select a value from a predefined set of options. Each option can have a corresponding line status – Passed, Failed, or N/A – that will be set when it is selected. Here is an example of a Single Value line below a Header line:

Additional Line Options

Now we’ll review the three new options available in the beta: Allow N/A, Prompt for Issue, and Custom Labels.

>Allow N/A Option
The Allow N/A option controls whether the “N/A” status should be available for a line. Here is an example of a Standard Question line that does not allow N/A:

> Prompt for Issue Option
The Prompt for Issue option controls whether the user should be prompted to create an issue when a line’s status is set to “Failed”. With this option you can also specify that the issue creation form starts with one of your issue presets, making it possible to provide suggested language and field values for the issue.

Here is an example of prompting for an issue:

> Custom Labels Option
Custom Labels are specific to the Standard Question line type, and allow you to provide custom labels for the Passed, Failed, and N/A statuses. Here is an example of a Standard Question line with custom labels:

Known Limitation During Beta

During  the beta period there are a few known limitations:

  • iOS app version 7.0 or greater is required to view and answer lines within accounts that participate in the beta. Check the App Store for updates to CxAlloy. 
  • Checklist and test lines that are using the new line types system are currently not able to be edited or added via the iOS app. You can still answer, add notes, add files, and add issues to all lines. The ability to add and edit all lines will be added to the app in an update coming soon.
  • Batch answering is currently only available for checklist and test lines that do not use the new line types system. We will add support for the new lines system to batch answer in a future app update.
Participating in the Beta

Account owners and admins can request to be added to the beta. Accounts will be added to the beta on a rolling basis. If you are interested in having your company’s account participate in the beta please contact support@cxalloy.com.

Questions on Line Types? Check out our support article on the other Line Type enhancements made in October 2022 or reach out to our support team at support@cxalloy.com. We’re here to help.

New Features – Issue Attributes and Issue Presets

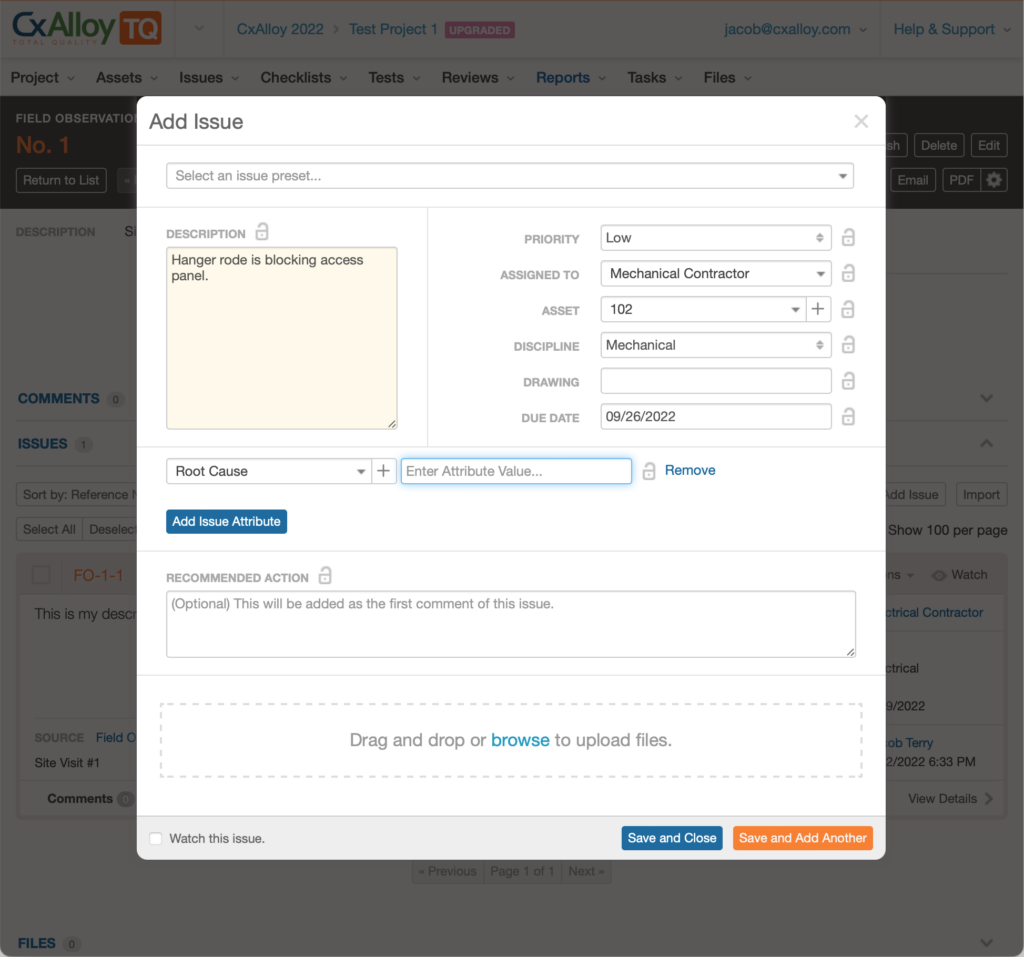
We’ve just launched two new features in for building commissioning: Issue Attributes and Issue Presets. These represent a significant enhancement to CxAlloy commissioning tools that expands what you can do with CxAlloy issues. What does this mean for commissioning professionals and other CxAlloy users? Let’s dive in. The addition of Issue Attributes and Issue Presets: 

  1. Adds the ability to track custom data on CxAlloy issues
  2. Adds the ability to easily create and use predefined issues
  3. Provides new options for sorting and searching your lists

Issue Attributes

We’re excited to share these new capabilities and help you streamline issue management. First, you will notice a small change to your Settings menu. Attributes is now Asset Attributes and we’ve added Issue Attributes underneath. Issue Attributes work similarly to Asset Attributes in that the default project settings are inherited from account defaults, the project settings can be copied when duplicating a project, and they are managed from the settings page. 

Using Issue Attributes is easy – you can add them during issue creation or you can add, edit, and delete Issue Attributes from the detail view of any issue. We’ve also brought over the Equipment list’s ability to batch edit attributes so you can add, edit, and delete attributes on several issues at once. Additionally, you can import and export attribute values when importing and exporting issues.

Issue Presets 

In addition to Issue Attributes, we’re introducing Issue Presets. Selecting an Issue Preset when creating an issue will insert predefined form values, including attributes. Not only can you dictate the values for any number of form fields, you can preselect attributes to be associated with each Preset.

Adding Issue Presets is easy – first go to Project > Settings and find Issue Presets in the Settings menu on the left. From there you can add a new Issue Preset and fill in the form to define the preset values that meet your project’s needs. Issue preset support will be coming to the iOS app in an upcoming update.

Search & Sort

We wanted to make Issue Attributes as useful as possible, and in service of that we’ve made it possible to sort by attributes and search within attributes.

For searching we’ve added a new dropdown to the search field when you’re in the Issues or Equipment list. This dropdown lets you pick a specific attribute you want to search.

For sorting we’ve added attributes to the sort options. To make this possible without taking up too much space in the left sidebar, we moved the sorting controls above the list on the right side. All of the previous sort items are still there along with the new attribute sort options.

A note on sorting: We’ve maintained all previous sort functionality – like sorting in ascending or descending order and applying a secondary sort by holding Shift while clicking a second sort. 

We hope you’re as excited as us to start using Issue Attributes and Issue Presets. For additional details, please read our support articles on Issue Attributes and Issue Presets.

Dropping iOS 14 Support in the CxAlloy iOS App

iOS 14 text on colored background

The CxAlloy iOS app will drop support for iOS 14 starting with version 6.8 of the iOS app. If you are running iOS 14, version 6.8 of the app and future app updates will not be available until you update your device to iOS 15. This does not prevent you from using earlier versions of the app – versions of the app prior to 6.8 will continue working and syncing just as they do today. However bug fixes and new features released in future app updates will not be available until you update your device to iOS 15.

We encourage all users of the iOS app to update to iOS 15 for the best experience now and to experience upcoming features. All devices that support iOS 14 can be updated to iOS 15. For information on how to update iOS please see Apple’s support article.

Additional Background

In this case we are dropping support for iOS 14 earlier than we usually would. The primary driver is a bug in iOS 14 that causes the scroll position to jump when answering checklists and tests that we have not been able to resolve despite several weeks of effort. That bug manifested when we adopted a new technical architecture from Apple. If you’ve been frustrated by that bug please know that we have been working diligently to find a resolution.

After we worked for several weeks to resolve the bug without success we felt we had two choices: revert back to the previous architecture or continue with the new architecture and drop iOS 14 support. In this case the new technical architecture is required for us to implement upcoming features – features that are significant and highly requested – so we made the decision to drop support for iOS 14 earlier than we otherwise would. We’ll have more to share on these new features in the coming weeks.

CxAlloy TQ Downtime Postmortem

black backlit keyboard

On Wednesday, March 23, CxAlloy TQ experienced a period of extended downtime as the result of a failed database migration. This postmortem will explain what went wrong, the steps we took to recover, and the changes we are making to mitigate the chances of such an event in the future.

Most importantly, we would like to deeply apologize for the disruption the outage caused. We know that the availability of our software is directly tied to your ability to get your work done and it is a responsibility we take very seriously. Postmortems, such as this one, are part of our commitment to you to provide a high-level of service by examining those instances where we fall short and communicating to you how we are improving our systems and processes to be more resilient and dependable.

Incident Timeline

11:06 PM Eastern – Site update performed and change to database structure begins

The evening of March 23 starting at 11:06 PM Eastern we released several updates to the application. These updates included two database “migrations”, or changes to the structure of the database.

The second migration added several new columns to the table that stores checklist lines. Because that table is so large (approximately 125 million rows) we knew from past experience that adding these new columns would likely take several hours, but adding columns does not block the application from operating. No downtime was expected as a result of this change and we have performed similar actions many times in the past.

4:45 AM Eastern – Database error occurs

At approximately 4:45 AM Eastern time the migration failed which caused the database to automatically shut down and initiate a restart. Our initial analysis indicates that the migration failed due to excessive contention for server resources that built up over the course of the migration.

Our team discovered this issue just before 5 AM Eastern and begin communicating the issue to other team members and working towards a resolution.

Shortly thereafter we closed the site to users and posted our prebuilt maintenance page that directs users to our status page for further information and updates. Later in the day we updated that page with more appropriate messaging for the nature of the incident.

5:34 AM Eastern – Database is restarted and status page incident is created

At 5:34 AM Eastern we updated our status page (status.cxalloy.com) with the incident and the information we had at the time. We would continue to update our status page throughout the day.

The first thing we did was wait for the database to complete its restart cycle. On the rare occasions in the past where a database error has occurred it has been resolved by the automated restart of the database. This step alone is painful, however, as restarting our database takes over an hour due to its size. The restart started at 4:47 AM Eastern time and was not completed until 6:03 AM Eastern.

When the database completed its restart we began verification that the database was fully functioning. This is when we discovered that the checklist lines table would not load. Bringing up the logs showed:

Table `cxalloytq`.`checklistsectionline` is corrupted. Please drop the table and recreate it

6:34 AM Eastern – Backup data is secured

At this point our primary concern was securing your data to ensure no data would be lost. At 6:34 AM Eastern we ran an export of the checklist line data from our backup database and moved that to another machine. We ran a second export at 6:56 AM Eastern after the replica had a chance to synchronize the remaining data captured in the source database’s logs (data that had been created during the time the source database was attempting to run the migration that ultimately failed).

At the same time we investigated whether it was possible to repair the corrupted table rather than recreate it. We determined based on the logs, server state, and MySQL’s documentation that it was not possible to repair.

We are now approaching 7 AM and customers are logging on. Our goal is to get the site up and running as soon as possible. In pursuit of this goal, and having secured the data, we began the process of removing the corrupted checklist lines table and replacing it with the one exported from our backup. Our plan was to consider other options, including failing over to our backup database, while the data was rebuilt.

7:18 AM Eastern – Restore begins and a mistake is made

At 7:18 AM we began the restore of the checklist lines table from our backup. Unfortunately we made a critical error at this point. We failed to pause replication to our backup server before starting the process of replacing the checklist lines table. This meant that the backup database, replicating the actions of the primary database exactly, also removed its checklist lines table. The result of this mistake was that our only option to bring the database back up was to wait for the restore to complete.

We did not discover this failure to pause replication until approximately 8:15 AM. That is when after an hour of observation we estimated the data restore was going to take 10 hours or more. That crossed the threshold where it is worth it for us to instead switch over to our replica database. As we began to prep for that switch we discovered our earlier error.

The team discussed whether it would be possible to open the site in a limited state that blocked access to the checklist areas. However, because of the interrelated nature of CxAlloy data we determined this was not feasible. Other areas, such as issues and files, would attempt to pull in checklist line data and fail.

8:39 AM Eastern – Waiting for restore is determined as the course of action

At 8:39 AM Eastern we determined that our course of action was fixed – we had to keep the site closed while the restore completed.

At 9:11 AM Eastern we posted an update on the status page of the situation, including that the restore would take 10 hours to complete. From that point on we observed the restore, posted regular updates to the status page, and continued to communicate with customers through our support channels.

At approximately 9:30 AM we also paused the automated jobs we run in the background, such as sending out activity notifications.

5:47 PM Eastern – Restore completes

At 5:47 PM Eastern the restore finished. We posted an update to the status page at 5:52 PM Eastern that the restore had completed and the site would open after we verified the completeness and stability of the restore.

Over the next 30 minutes we tested the site and iOS app against the restored data, verified that the full data set was present, and tested for general application stability and performance.

6:21 PM Eastern – Application is made available

At 6:21 PM Eastern we reopened the site. At 6:29 PM Eastern we posted an update to the status page that the site was now open and changed the incident status to “Monitoring”.

Over the remainder of the evening we observed the operation of the application for any issues. Finding none through the evening and overnight, we resolved the incident at Thursday morning at 8:44 AM Eastern.

Process and Infrastructure Changes We Are Implementing

We never want to experience anything like this again. We have evaluated the failure points in this incident and will be implementing the following changes.

Process Changes

  • Adding columns to large tables will be done using a different methodology. Instead of adding the column in-place to the existing table we will create a new table with the updated structure and copy data to it prior to any application update. At the time the application is updated we will then rename the tables so the table with the new structure comes into use. We have used this approach in the past with success and it provides greater resilience and control compared to modifying a table in-place.
  • Releases that involve migrations on large or critical tables will be done outside of the business week. This incident was more impactful than it might otherwise have been because it happened on a business day during business hours. We have found that releasing application updates during the week usually provides a better experience for our team and users because it allows the quick identification and correction of any issues, however for database changes that have the potential – however unexpected – to cause downtime we will no longer do those during business weeks.
  • Implement a “buddy system” for emergency actions. A significant factor in the length of this outage was the inability to fail over to our replica due to a mistake we made. Although the team was communicating and working together, each member was taking individual actions in their domain to address the issue. Going forward we will require at least two people to give an OK before infrastructure actions are taken during incident response. We can never eliminate the possibility of a mistake being made but we can reduce their likelihood.

Infrastructure Changes

  • A second replica will be created. Although the failure to pause replication in this instance was purely a mistake, by having a second replica it allows us to make pausing a replica part of our standard process rather than a decision that has to be made during the incident.

In addition and separate from this incident, our offsite backup program is moving to a frequency greater than 24 hours. Although our offsite backups were not a factor in this case there is always the possibility that a catastrophic situation happens (such as a data center burning down) that could require restoration from an offsite backup. At the size and scale we now operate we believe it is insufficient to have the potential to lose more than a few hours of data even in the case of a truly catastrophic situation.

Our Commitment to You

We are always trying to get things right. In this case we got it wrong. When that happens we look at what where the problem came from, identify the solutions, and implement them. We’ve done it before and we will do it here, and we will – as always – aim to be open, honest, and transparent with you about our efforts.

Project Files Now in the iOS App with Offline Support

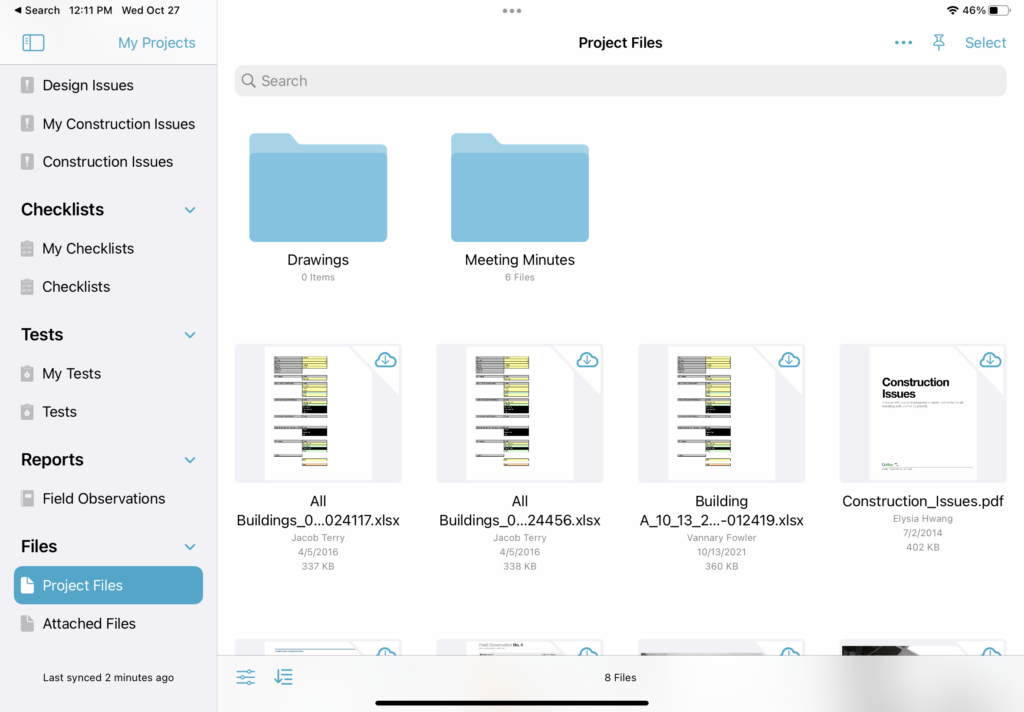
Since the first version of the iOS app you’ve been able to add and view files attached to issues, checklists, and other items in the app. Now, with version 6, for the first time the Project Files section comes to your Apple device.

With this addition you can view, add, and manage folders and files found in the Project Files section of your projects directly on your device. And, like everything in the app, the Project Files section is available while offline allowing you to move, rename, and add files and folders without an internet connection.

The new Project Files section in the iOS app.

Not only that, but version 6 introduces a new Pin feature to mark a file or folder to be downloaded and kept offline, ensuring you can view and annotate the files you need when you need them. It works similarly to the offline features you’ll find in dedicated files apps such as Dropbox, OneDrive, and Box. Files added to folders that you’ve pinned are automatically downloaded for offline use the next time you sync.

Project Files also enables adding new files from your device. Adding files is easy using the system file picker, photo library, camera, or even dragging and dropping files or entire folders from other apps.

There’s even more in version 6, including:

  • A new Attached Files section where you can see all the files attached to issues, checklists, equipment, and other items listed together in one place for easy searching and viewing.
  • Batch actions for files, allowing you to pin many files and folders at once.
  • Expanded share support for sending files to other apps.
  • Enabled drag and drop of files and folders between apps.
  • Improved attribute confirmation flow on top lines in Batch Answer.

We hope you enjoy it!

Watch our featured topic video to see a demonstration.

Sunsetting Checklists with Sections

Three years ago, we began offering an upgraded project experience that enables additional functionality and adds new features to CxAlloy. Many of these exciting features are only available to updated projects. Starting on November 30, 2021 we will begin automatically updating all accounts so that any new projects will have access to these great features.

This update will be performed according to a predetermined schedule which is included in the FAQ below along with other key details.

We understand that changes like this can be intimidating and perhaps scary. We’ll be doing everything we can to make the update as easy and low impact as possible by providing additional communication and support documentation in the lead up to the update, including comprehensive support articles and overview videos.

Please feel free to reach out to support@cxalloy.com with any concerns or additional questions you may have.

FAQ

What is happening?

Starting on November 30, 2021 we will begin updating any account that is not currently updated.

Why is this happening?

We made this change to enable functionality that was not possible previously, including:

  • Reporting on checklist progress by discipline, assignment, and status.
  • Finding just those checklist items assigned just to you or anyone else, without including checklist lines assigned to others.
  • Creating multiple checklists from multiple templates in one pass.

In addition to those primary benefits we have rolled out many features that are only available to updated projects. These include:

  • Ability to batch edit checklists, including changing their status and assignment. Ability to batch answer checklists and tests in the iOS app.
  • Ability to batch create checklists and tests in the iOS app.
  • Ability to push template changes to existing checklists.
  • Ability to organize your templates into folders.
  • Ability to request and collect signatures for checklists and tests.

What does “updating” an account mean?

Updating an account means that new projects you create going forward will have a different structure for their checklists and checklist templates. In an updated project, checklists and checklist templates will not have multiple sections.

In addition, account templates with more than one section will be split into multiple templates.

Importantly, your existing projects will continue to work as before with full support for multiple sections. No data within your existing projects will be touched.

For more details on these changes please read our support article.

When is it happening?

Accounts will be updated according to a schedule based on the account ID. You can find the account ID in the General tab of Account Settings.

The schedule assigns the week an account will be upgraded, not a specific day, however account admins will be notified at least 24 hours before the day the upgrade takes place. All upgrades will occur after 5 PM Eastern time.

Account IDWeek
1 through 199November 30 – December 5
200 through 399December 6 – December 12
400 through 599December 13 – December 19
600 through 799December 20 – December 26
800 through 999December 27 – January 2
1000 and aboveJanuary 3 – January 9

Is my account already updated?

You can find the update status in the General tab of Account Settings. Note that if your account was created in 2019 or later it is already updated.

What is a “checklist section”?

A checklist section is a portion of a checklist that has an independent status and assignment. In the screenshot below, two separate sections are visible and highlighted in red.

These checklist sections will not be possible in projects created after an account is updated. Instead, in those projects you would achieve the same end result by having multiple checklists, each with its own assignment and status.

A Faster, Prettier, and Smarter Account Projects List

We recently released an update to the Account Projects List that makes it faster, prettier, and a little smarter.

Faster

One of the best parts of the account projects list is the ability to see each project’s dashboard right in the list. While this feature is pretty awesome, it could be less awesome for accounts with many large projects due to longer load times.

With this update the list loads immediately and the project dashboards load after. Now whether your account has one project or 100 the list shows up right away.

Prettier

We’ve redesigned the dashboard tooltip to provide more information in an attractive visual format. You now get an easily scannable visual of the percentage breakdown between statuses along with specific counts and percentages for each status.

Smarter

Lastly, we’ve made the list remember the last sorting option you selected and automatically use it the next time you view the list. No more changing the sort every time you load the page!

Procore Integration Webinar

Webinar: Keep everyone up to date on commissioning issues by connecting Cx professionals with the construction team.

QUESTIONS FROM WEBINAR

Do you know if there will be an integration to pull startup inspection checklists from Procore into CxAlloy? What about field observation reports and meeting minutes? Drawings and RFIs?

We plan to add additional points of integration with Procore over time. We are still evaluating which areas make the most sense, but integrating CxAlloy TQ checklists and tests with Procore’s inspections is currently one of the most likely additions. Other content such as field observations, meetings, drawings, and RFIs may be possibilities in the future.

How does it work if you already have Procore? Is there an additional cost?

There is no cost for the CxAlloy TQ Sync app in the Procore Marketplace. So, if you have a Procore subscription and a CxAlloy subscription, then you are good to go!

Can you force CxAlloy to sync with Procore for situations like when you’re in a meeting others waiting on an update?

Although you can’t start a sync on-demand, changes from CxAlloy TQ should show up in Procore within 10 minutes, and changes from Procore should show up in CxAlloy TQ nearly instantaneously. The capability to initiate a sync on-demand is something that we have on our list, and we are looking for feedback from users to help guide our development roadmap.

Can you use the location field within Procore to assign the observation to a piece of equipment

We are pursuing a number of enhancements to the issue integration, including using Procore’s “location” field to capture the CxAlloy TQ issue’s related asset.

Does the admin in Procore and the admin in CxAlloy need to be the same user? Or can it be divided between two users?

The admin in Procore does not need to be the same person as the admin in CxAlloy TQ.

Two different user authorizations are necessary to enable Procore Integration, represented as two discrete steps in the Procore Integration:

  1. Connect to Procore“. CxAlloy TQ must receive an authorization for a specific Procore user, and that Procore user must approve the CxAlloy TQ Sync app. Clicking “Connect to Procore” redirects to the Procore login page and then prompts the user to authorize the CxAlloy TQ Sync app after logging in. The Procore user must have the following Procore permissions:
    • ‘Admin’ on the project’s Admin tool (Necessary to configure project Webhooks)
    • ‘Admin’ level permissions on the project’s Observations tool. (Necessary to allow for deleting of observations).
  2. Configure Procore“. The integration must then be configured and enabled by a CxAlloy TQ user with the following project permissions:
    • ‘Manage’ for Settings
    • ‘Manage’ for Design Issues and/or Construction Issues (only necessary with the “Ongoing Sync” approach).

Ultimately both steps must be performed by a CxAlloy TQ user that has ‘Manage’ permissions for Settings, as both steps are within the Project Settings area. However, the two steps (“Connect to Procore” and “Configure Procore”) do not have to be performed by the same CxAlloy TQ user. In addition, the user that performs the “Connect to Procore” step does not need to retain the ‘Manage’ permissions for Settings after successfully connecting.

This means that you could invite in a GC that has the required Procore permissions and have them perform the “Connect to Procore” step, authorizing the integration under their Procore user account. You could then remove them from the project or turn off their ‘Manage’ permissions for Settings, and have a different CxAlloy TQ user perform the “Configure Procore” step.”

Does the same company need both subscriptions? As a Cx company, we work with contractors who use Procore but they are the ones with the subscription and we are invited to it, similar to how we have a subscription to CxAlloy and invite contractors.

No, the subscriptions to CxAlloy TQ and Procore can be held be entirely different companies. All that is needed is an authorization from a Procore user with the necessary permissions in the Procore project.

Can we see the issue activity details (on the CxAlloy issue) to visualize how the “syncs” are captured?

Yes, any changes to issues that happen as a result of the Procore Integration will show up under the “History” area of the issue. These actions will all show up as actions performed by whichever user configured and enabled the Procore Integration.

How do the observations in Procore get assigned to particular users that are required to respond to issues?

The observations created in Procore will not have an assignment, regardless of the assignment of the associated CxAlloy TQ issue. Observations created in Procore through the integration will therefore need to be assigned independently. We are investigating ways we might be able to enhance the integration in the future to maintain the assignment.

Is there a way to choose which project CxAlloy syncs to within a Procore Company Project?

You can choose on a project-by-project basis within CxAlloy TQ whether you want to turn on the Procore Integration. Then, as part of configuring the integration you choose which Procore project to integrate with. These choices are made within CxAlloy TQ, not Procore.

Any future plans to work with PlanGrid as well?

We intend to expand our integrations to additional platforms in the future, and PlanGrid (or more generally, Autodesk Construction Cloud) is one of our top prospects.

How do you know who really made the changes if you can log into Procore and CxAlloy as a different person?

To see who originally made a specific change you have to view that change in the system it originated from. If a change originally came from CxAlloy TQ, you would look in the “History” section of the issue to see who made it. If a change originally came from Procore, you would look in the “Change History” section of the observation.

In addition, the integration will append the issue creator’s name to the observation’s Description, and comments (both originating from Procore and from CxAlloy TQ) always have the commenter’s name appended to the comment.

Within the Procore Observations module, there are a number of metadata fields like “Contributing Conditions.” Are these fields mapped to CxAlloy?

Not all fields available in Procore and CxAlloy TQ are mapped to each other. The fields that are mapped are:

  • Description
  • Status
  • Priority
  • Due Date
  • Discipline (labeled Trade in Procore)
  • Comments
  • Files (called Attachments in Procore)

Some fields that CxAlloy TQ has are appended to the description, including Asset, Drawing, and the name of the issue creator.

We are pursuing a number of enhancements to the issue integration and this is certainly one we will look into.

Can the sync and issue pass over be changed from one time to continuous and switched back and forth depending on the stage of the project? Can the priority mapping be changed for issues at different stage of the project?

You can change the configuration at any time via the “Change Options” button found in the toolbar on the Procore Integration settings page when Procore integration is enabled.

Are there any issues if someone in Procore makes changes to the comment where the asset information is listed from CxAlloy when it is synced back to CxAlloy?

Changes to the description in Procore will always sync back to CxAlloy TQ. As long as the line “————— CxAlloy TQ Details —————” is not changed, nor anything below it, then the “CxAlloy TQ Details” section will only appear in Procore and not in CxAlloy TQ. If that line is removed or edited then changes will still sync back, but the changes will include the complete content (including anything previously found within the “CxAlloy TQ Details” section).

What are the most notable limitations, currently?

See our Procore Integration support article for details on limitations. The most notable is likely that assignments are not carried over, and we are currently exploring ways to address that.

Is it possible to copy/sync multiple CxAlloy projects to a single Procore project?

Currently this is technically allowed but not supported. The results of doing so are unpredictable. A future update will address this situation, though it may be necessary for us to block it rather than support it.

Does a contractor using Procore need to add the CxAlloy App to their Procore dashboard as well, or once I integrate and sync on my end will the pushed observations show up for anyone belonging to that project in Procore?

Other Procore users in the project do not need to do anything. Once the integration is enabled the observations brought over via the integration will be visible to all Procore users (assuming they have access to Observations in that Procore project) without them having to do anything.

Can there be more than one authorized CxAlloy user for sync?

Not at this time.

Can the one-time sync be repeated without creating duplicate issues/observations, where it updates those that have already been created but on a more manual time interval?

Not currently.

Can you explain the default handling for statuses on Procore again? What happens if there is no match on CxAlloy? Does the status mapping have to be one to one? For example, can the Procore status “Ready for Review” map to multiple CxAlloy statuses?

The mapping does not have to be one-to-one. Multiple CxAlloy statuses can map to the same Procore status.

The mapping works by first ensuring that every CxAlloy value maps to a specific Procore value. If a CxAlloy value maps to exactly one Procore value, then the reverse mapping is assumed. For example, if the CxAlloy status “Closed” is mapped to the Procore status “Closed”, and no other CxAlloy status maps to Procore’s “Closed” status, then when an observation is set to “Closed” on the Procore side it will be set to the CxAlloy “Closed” when it syncs.

If you select the same Procore value for multiple CxAlloy values then you must choose the “reverse mapping” – which of the CxAlloy values should be set when that Procore value is set. For example, if you selected the Procore status “Ready for Review” for both “In Progress” and “Pending Verification” CxAlloy statuses, then you must choose which of those two should be set when the status is changed to “Ready for Review” on the Procore side.

If there is a Procore value that you don’t select when mapping the CxAlloy values, then the “reverse mapping” of that Procore value is the default CxAlloy value. For statuses this is your initial issue status (often “Open”), or blank for Discipline and Priority. For example, if “Open” is your initial CxAlloy status, and none of the CxAlloy statuses are mapped to Procore’s “Not Accepted” status, then when “Not Accepted” is set on the Procore side the CxAlloy status will be set to the “Open”.

Can an integration template be created to make integration easier instead of having to select everything each time for each job?

Not currently, but that is an excellent suggestion. In general we plan to reduce the friction in setting up the Procore Integration with future updates.

Can you link to Procore document from within CxAlloy without additional sign in?

Yes, if all you want to do is provide a link to a resource in Procore you can do that by pasting the link. CxAlloy TQ automatically detects links and makes them clickable within the interface.

Will you have another webinar down the road for these questions?

Thank you! We’ll look at having another session on Procore integration.

People PDF and Include Contacts – Customer Appreciation Summer Week 8

Further expanding on the recent addition of People sections to the Report Generator, this week’s feature release includes the ability to generate PDFs directly from a project’s People list, and an accompanying Include Contacts pdf option that is available from both the People list and the Report Generator.

PDF and options button as it appears on a project’s People page.
Include Contacts option for People PDFs.


Include Contacts option for People Sections in the Report Generator.

Let us know if there are any additional options that you may find useful; any other feedback or ideas for new features are always welcome as well.

Issue Date Closed Sort – Customer Appreciation Summer Week 7

This week’s feature is a highly requested sorting option for issues: date closed. A simple but powerful addition to our existing sorts and filters, the new date closed sort functions similarly to the date updated sort, separating open issues while grouping closed issues by their relative completion date.

Default date closed sort with open issues at the top.

Reversed sort beginning with most recently closed issues.

This sort can be used in tandem with any other sorts and filters and in PDFs as well, providing a clear report of issue progress across areas of interest within a project.

Issue list PDF with date closed sort applied.
Open issues group as it appears in PDFs.
Relative closed issue group as it appears in PDFs.

As with all of our features, we welcome any feedback that may help us expand or improve upon this functionality in the future.

Report Generator Duplication – Customer Appreciation Summer Week 6

Often times, users have found themselves needing to generate multiple reports for a given project with slightly varying configurations. Even if a similar configuration existed, users would have to build a new report from scratch. This week’s feature addresses that problem by allowing users to duplicate existing report configurations.

Action bar Duplicate button when viewing an individual report.
Batch action bar Duplicate button when selecting multiple reports from the list view.
Example duplicate report.

This new duplicate feature has been implemented as an additional button in both the detail view’s action bar for an individual report, and the list view’s batch action bar when selecting multiple items. Duplicated reports will have the exact same report sections and section options as the parent report at the time of duplication, with the word “Copy” appended to the name to differentiate it from the original. After creation, the duplicate can be modified freely without effecting the original, drastically reducing administrative overhead in the Report Generator section.

As with all of our features, we welcome any feedback to further improve your user experience moving forward. Please submit any recommendations or ideas to “support@cxalloy.com”.

Announcing our Partnership and First Integration with Procore

We’re excited to announce that we are launching our first integration point as the first step in our partnership with Procore. Watch our recent roadmap webinar to learn more about this and other exciting plans for CxAlloy TQ.

We are starting our Procore integration with the most obvious and requested connection point – bringing CxAlloy TQ issues into Procore as commissioning observations. Our integration operates at the data level, allowing direct communication and either one-way copying or two-way syncing between Procore and CxAlloy TQ.

Our goal, as ever, is to reduce the amount of time and tedium in managing data by simplifying and automating those tasks.

One-Time Copy

The one-time copy option is for those situations where you want to create issues in CxAlloy TQ but prefer issue follow-up and resolution to be managed exclusively through Procore.

With this approach, you choose which status triggers the copy to Procore, and which status is set after the issue is successfully copied. CxAlloy TQ issues with the designated status are copied to Procore, including the issue’s comments and files. After being copied, the CxAlloy TQ’s issue status is updated to indicate the copy was completed.

By leveraging statuses as the trigger for copying issues to Procore you can easily control which issues get copied and see which issues have been copied. In CxAlloy, you also get the benefits of all the tools that already exist for managing statuses such as batch editing and import.

Ongoing Sync

With the ongoing sync approach, all CxAlloy TQ design and/or construction issues created in the project are copied to Procore. Updates to the observation in Procore are synced back to the CxAlloy TQ issue, and updates to the CxAlloy TQ issue are synced back to the Procore observation.

As with the copy operation, the ongoing sync approach includes issue comments and files, with the addition that new comments and attachments in Procore are brought over to CxAlloy as well.

Per-Project Settings

We’ve designed our integration to be flexible, with the ability to enable and customize it on a project-by-project basis. The integration options can be changed or disabled altogether at any time. After authorizing a project through Procore, CxAlloy TQ automatically runs the integration at regular intervals and safely manages credentials.

Learn More

For more information, read our support article or watch our short overview video.

The Beginning of Great Things

As we evolve our partnership with Procore in 2021 and beyond we plan to deliver deep integration across many areas. We hope this new integration helps you to Get In, Get Done, and Get Home faster than ever before.

Report Generator People Section – Customer Appreciation Summer Week 5

This week’s feature release is the long awaited addition of a People section to the Report Generator. Users can now add a People section to their reports, which will include the name of all users in the project, as well as their email, phone number, company, and role.

Report with People section
People section title page
People section as seen in reports

As with all of our features, we welcome any feedback to help us make any additional improvements.